Maybe this will be useful to someone!
Many years back (2006 I think) I bought two Hanns G HX191D monitors – 19″ TFTs – and have been very happy with them since. Not a dead pixel in 10 years! Sadly, one of them started cutting out a few months ago, the power cycling on-off, so I thought it was time to move on. However, as I do, I stuffed it in the loft while I thought about repair options, and helpfully sourced an identical monitor on eBay – with local pickup only a few miles away – for £5.
A little while later I spotted a repair kit on Amazon for this monitor. Seemingly a common problem is that the capacitors in the power circuit expire and a simple replacement of the 7 capacitors will sort the monitor. I’ve seen dead caps before, my trusty old aBit KT7A motherboard succumbed to them back in about 2007, with some of the capacitors tipping right over and leaking their electrolytey goodness all over the board. So it seemed worth a go for the few dollars that the repair kit cost. Originally bought this kit (currently seems to be unavailable). There is also a kit here that will probably do the job.
Having repaired one monitor, the other one died only a few days later (obviously from the same batch) so I repaired that one using a capacitor I already had in my box of stuff, and some new Panasonic caps I bought from ebay for a couple of pounds (and much quicker delivery!). If you do this, you need the following:
2x 1000uF 10v
3x 470uf 25v
1x 470uF 10v
1x 22uF 50v
Higher voltage rating will be fine too, just more expensive to buy – so you can do as I did and get 4x 25v 470uF caps.
Some weeks after ordering, the original kit arrived in the post. No worries about it having enough stamps!

Accessing the power circuitry is just a case of taking out the screws from the back of the monitor case (the bottom middle four also release the monitor’s stand), and using a thin flatblade screwdriver to pop open the clips that hold the front bezel to the back. There is a guide for a similar monitor here. The circuits are under a metal shield in the middle, which also needs carefully removed, with the cables coming out of it at the sides carefully unplugged.
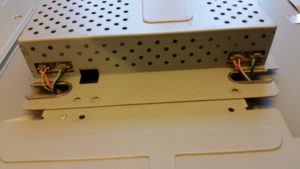
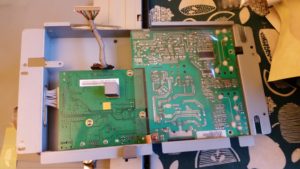
Once the board is free, it looks like this. If you look carefully, you can see the bulges in the tops of the capacitors. Definitely they are on their way out.

The ones to remove are highlighted here:

I have a helpful vice I can use to hold the board up while soldering. Removal was a case of heating the solder on the bottom of each one (two pins for capacitors), using desolder braid to take up any excess, and long nose pliers to pull the components from the top. Some had a glue like substance holding them on the board but this broke up easily enough.


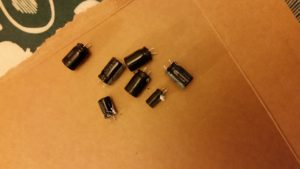
Be careful to note the value on the capacitors you remove so you can replace them, and note which side is negative (both are clearly marked on the side of the cap itself, and the negative is also shown by a hatched area on the component’s outline on the circuit board). The put in the new capacitors, with a little drop of solder and a good hot iron (I have a nice adjustable one that goes up to 400 deg C so it can very quickly melt the solder – if you take too long you can end up overheating the components!). Remember to heat both the cap’s legs and the track on the circuit board so the solder sticks properly. Finally trim the excess from the legs with some wire clippers.

Carefully reassemble. It was truly satisfying to see the monitor light up again! And only a slight disappointment that the other from the pair died so quickly afterward, so I had to repeat the whole process again.
Now, the only remaining question: I bought a cheap monitor as a stopgap while awaiting the repair. What could one possibly do with a third monitor?